"Portable Wi-Fi" Review
25/03/2022

Record Slide Show command
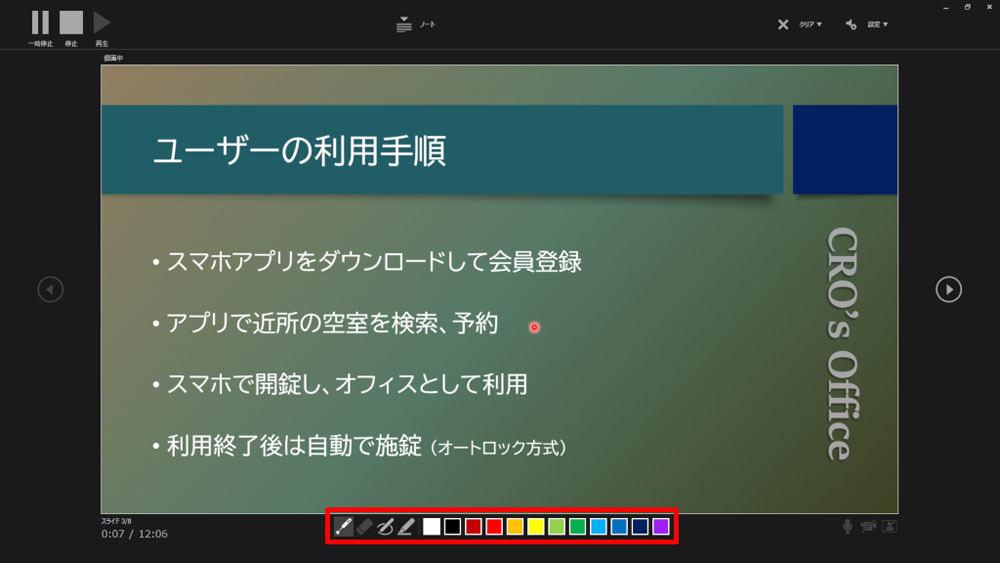
The following screen will be displayed in full screen. This is the "narration recording screen". Click the "Record" button to start recording.
The countdown begins with 3, 2, 1, and recording starts at 0 (number 0 is not displayed on the screen).
After that, all you have to do is explain the content of your presentation to the microphone and proceed with the slide show. To advance to the "next slide", click on the slide with the mouse or click the icon on the right side of the screen.
Of course, you can also run the animation specified for each slide. When the animation is started by clicking the mouse, the timing is also recorded.
After advancing to the "Last slide", clicking the mouse again displays a black screen that says "This is the end of the slide show. Click to end." This completes the recording of the narration. Clicking on the screen closes the "narration recording screen" and returns to the normal editing screen.
Once you've recorded your narration, you should see a "speaker" icon appear in the lower right corner of each slide. This icon becomes an icon indicating "with narration".
As mentioned above, there are no particularly difficult operations to record the narration itself. You can complete the recording just by advancing the slide display and animation, just like when running a normal slide show.
More than that, many people find it difficult to read the narration in a crisp tone without chewing. This is beyond the scope of this series, so I can't give you precise advice. If you can't speak well, you may need to ask a colleague who is good at presentations to help you, or ask a professional voice actor.
In addition, it is necessary to remember the precautions unique to PowerPoint. PowerPoint's recording function has a weak point that "the recording is interrupted for a moment" when proceeding to the next slide. For this reason, you should avoid continuing the story across slides while switching to the "next slide".
Especially if you are using the "screen switch" to advance to the "next slide", you must be aware that the recording will be interrupted while the "screen switch" is being performed.
When you switch to the "next slide", you need to stop talking and wait for a while before starting to speak into the microphone. For greater certainty, resume reading the narration after a second has elapsed on each slide.
Next, let's introduce the operation procedure for confirming (playing back) the recorded narration.
When you move the mouse pointer over the "speaker" icon displayed on the slide editing screen, a control panel for playing the narration appears. Click the Play button here to play the narration recorded for each slide
If you want to follow the narration throughout the presentation, just press F5 to run the slideshow.
It's hard to tell on the screen, but you'll be able to see the slideshow running while the narration is playing. Since the ``slide switching timing'' and ``animation start timing'' are also reproduced during recording, it is possible to proceed with the slide show fully automatically.
Of course, there is also a way to disable the recorded narration and timings and run the slideshow. In this case, turn off the check box shown below and start the slide show.
As a result of playing back the narration, you may think "I want to re-record the recording again...". In this case, it is possible to retake the narration for each slide.

First, select the slide on which you want to redo the narration recording. Select the Animation tab and select Record Slideshow -> Record from Current Slide.
Then, the "narration recording screen" will be displayed with the current slide as the base point. All you have to do is click the "Record" button to start recording.
If you click the "Record" button, the "existing narration" recorded on that slide will be deleted. It should be remembered that the recording of the narration on each slide is essentially an "overwrite".
When you have finished recording your narration, click the Stop button in the upper left corner of the screen. At this point, the "timing to switch to the next slide" is also updated.
To return to the normal slide editing screen, click the "x" at the top right of the screen. If you can record well, do not forget to "overwrite save" the PowerPoint file.
Like any other editing task, you need to 'Save' or 'Save As' the file before you can save the 'recorded narration'. Note that if you exit PowerPoint without saving, your recorded narration will be deleted.
Just in case, I will also introduce how to delete the "narration" and "timing" recorded on each slide.
To do this, simply select the "Animation" tab, then select "Record slideshow" -> "Clear" -> "Contents you want to delete". Now you can remove the 'narration' or 'timing' for each slide or all slides.
Next, let's briefly introduce the various functions provided in the "narration recording screen".
The narration recording screen has a function to display the 'notes' of each slide. Therefore, it is possible to record the narration while viewing the manuscript for presentation.
However, the display area of the notebook is small, and it is necessary to read the manuscript while scrolling, so it is not very convenient to use. Not only that, but it can also cause problems.
This is because if you rotate the mouse wheel while the mouse pointer is placed outside the note area, it will not be "scrolling the note characters" but "advancing to the next slide". If you make such an operation mistake, the recording work will end in failure.
Considering these points, it can be said that it is better to record the printed notes at hand instead of using the note display function, so that the work can proceed smoothly.
At the bottom of the "narration recording screen", icons for using the "laser pointer" and "pen" are lined up.
You can also use this feature to point a light spot on the slide or write on the slide with a pen. Of course, these actions are also recorded along with the narration.
At the bottom right of the screen, there are icons that specify ON/OFF of "microphone", "camera", and "wipe display". When you turn on the camera, you can shoot a video of your face and record the narration while wiping it.
Finally, let's take a look at how to convert a slideshow with a recorded narration into a video file.
When you're done recording, select the 'File' tab and select the 'Export' item in the left menu. Then select “Create Video” and you will be presented with a screen like the one below.
If you specify the image quality here and click the "Create Video" button, you can start creating a video file.
After that, you will return to the normal editing screen, but you must be aware that the video file will not be created immediately. Video conversion is a time-consuming process, and it may take 10 minutes or more depending on the performance of your computer. At the bottom of the editing screen, you will see "Video conversion progress", so you have to wait until this is completed.
Once the video conversion is complete, open the folder you specified as the save destination. You should be able to see that the video file has been created.
Double-clicking on this file will launch the video player application and allow you to watch the content of the video.
In this way, once the narration is recorded, it is possible to create a promotional video based on it. The created videos can be used for various purposes, such as posting them on your company's website or making them publicly available on YouTube. Of course, it is also possible to stream it as a video at the presentation venue.
As a slightly different usage, you can use PowerPoint as a "simple video editing application" by inserting a video into the slide. It will be useful someday if you remember it as a way to use PowerPoint for a wide range of purposes, not just for creating slides.