"Portable Wi-Fi" Review
25/03/2022


"Srcpy" is an application that allows you to display and operate the screen of an Androd terminal connected via USB / Wi-Fi on a PC. It is an open source project hosted on "GitHub" and licensed under "Apache License 2.0". It is compatible with Windows / Mac / Linux and can be downloaded free of charge from the release page of the project site. The editorial department has confirmed the operation on Windows 11.
Recent Windows 10 (including Windows 11) comes with an app called "Smartphone Sync" that allows you to easily remotely display and operate the screen of your Androd device. However, install the companion app "Smartphone Sync Management App" on your Android device in advance (Microsoft and some Samsung smartphones can use the pre-installed "Link to Windows") and link it with your "Microsoft account". Need to keep. It is supposed to be used privately to the last, and it is not very suitable for public situations such as wanting to share the operation method of the smartphone with "Zoom". In some cases, you may be confused about linking your "Microsoft account" or installing the app without permission, but even in that case, you cannot use the "Smartphone Sync" app.
In that respect, "scrcpy" has the advantage that it does not require any advance preparation other than enabling the developer function (adb debugging). If it is a development machine, it is often already enabled, in which case if you have "scrcpy" on the PC side, you can display and operate the screen of the Androd terminal just by connecting with a USB cable.

In addition, although additional work is required, it can be operated via Wi-Fi as well as "smartphone synchronization". For users who are worried about using a "Microsoft account" to connect, the fact that "scrcpy" is open source is also a reassuring factor.
In addition, the display can be freely customized (enlargement / reduction / rotation, etc.) with abundant command line options, and the operation can be recorded. The point that the operation is light, the point that there are abundant keyboard shortcut keys, and the point that you can install the application (APK) and copy the file by dragging and dropping are also attractive. It is assumed that the procedure to allow debugging described later has been completed, but it may also be useful if you want to use a smartphone with a damaged display as a test terminal.
To use "scrcpy", it is necessary to enable the developer function (adb debugging) of the Androd terminal in advance as described above. For "Android 4.2" or later, tap the [Device Information]-[Build Number] screen of the "Settings" app 7 times to enable the [Developer Options] screen, so turn on the [USB Debugging] option. Let's (this article omits Wi-Fi debugging). When you connect your Android device to your PC, a pop-up will appear asking if you want to allow USB debugging, so allow the [OK] button. This completes the preparation on the Android device side. Please note that the operation and screen may differ slightly depending on the device.
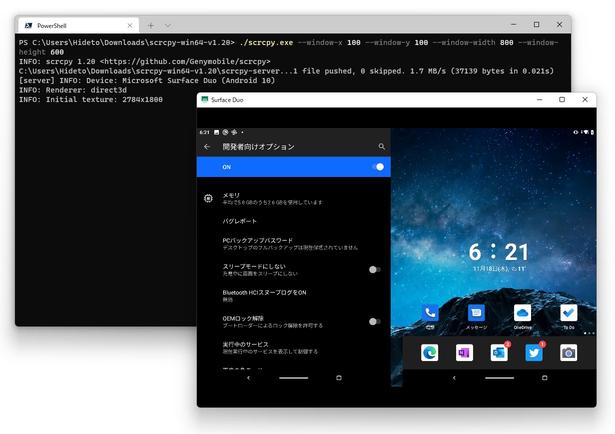
Tap the [Device Information]-[Build Number] screen of the "Settings" app 7 times to enable the [Developer Options] screen (when the screenshot is "Pixel 6") Turn on the [USB Debugging] option. When you connect an Android device to your PC, a pop-up will appear asking if you want to allow USB debugging, so allow the [OK] button. Execute "scrcpy.exe" to connect to "Pixel 6".To connect to your Android device from "scrcpy", just double-click the executable file. A connection window will appear, allowing you to display and operate the screen of your Android device. Recent smartphones have high resolution, so if you display the screen at this magnification, the connection window may become too large and it may be difficult to handle. In that case, specify the appropriate startup option from the command line and execute it. Below are some boot options that you might use often, so please refer to them. See the official documentation for details.
# 最大サイズを 1,024px に制限./scrcpy.exe --max-size 1024# ウィンドウの表示位置と幅・高さを指定./scrcpy.exe --window-x 100 --window-y 100 --window-width 800 --window-height 600# スクリーンの一部のみを切り取り(クロップ)。Oculus Goで役立つ./scrcpy.exe --crop 1224:1440:0:0# 接続ウィンドウを常に最前面に表示./scrcpy.exe --always-on-top# 接続ウィンドウをフルスクリーンで表示([MOD]+[F]キーでも可)./scrcpy.exe --fullscreen# 接続ウィンドウを 90°×n 回転([MOD]+[R]キーなどでも可)./scrcpy.exe --rotation 1# 接続ウィンドウを表示のみに(操作禁止)./scrcpy.exe --no-control# 接続時にデバイスをスリープさせない./scrcpy.exe --stay-awake# スクリーンをキャプチャーして保存scrcpy --record file.mp4Also, various keyboard shortcuts are available, so I would like to utilize them. The [MOD] (modifier) key is the left [Alt] key or [Windows] key by default in the Windows environment.
| operation | Shortcut |
|---|---|
| Home button | [MOD] + [H] key or middle mouse click |
| back button | [MOD] + [B] key or right mouse click |
| Task switching | [MOD] + [S] keys |
| Menu display | [MOD] + [M] keys |
| Volume adjustment | [MOD] + [↑] / [↓] keys |
| Power button | [MOD] + [P] keys |
| Power on | Right mouse click |
Clipboard operations (cut, copy, paste) can be combined with the general [Ctrl] key. When the Android device side is changed, it is also synchronized with the PC, so it is easy to exchange text data. However, there are some apps that are inconvenient when combined with the [Ctrl] key, so it is also possible to combine with the [MOD] key.


